Setting up your 3-key vault for ethereum (ETH)
This article will guide you in setting up your 3-key vault for ETH
Make sure you've checked out our guide to Getting started with the 3-Key Vault. If you're ready to set up your ETH vault, see the instructions below.
Standard Casa vaults uses a hardware device as one of the 3 keys in your vault. Note that only Ledger and Trezor devices are supported for Casa ETH vault.
See also: Supported platforms and hardware device firmware
Tap "Connect" in the middle of your 3-key ETH vault to view the keys associated with your 3-key vault.
First, we need to choose a relay.


Once you select this, you'll see your unconnected keys:

Next, we'll set up the mobile key.

Next, tap "Set Up Mobile Key." This will create a key directly on your mobile device in its secure enclave. This is one of the keys that you will normally use to sign and send transactions.
Next, we'll set up your hardware key.
Your hardware device will first need to be initialized. If you haven't already initialized your device, do that now. You will need to initialize your hardware device by following the instructions given in the packaging of your hardware device. We have various hardware device setup tutorials available for you.
Once your hardware device has been initialized, you can tap "Set Up Hardware Key" in your key list and follow the instructions to link the hardware device. An email will be sent to you requesting to "Connect your device."
Click on the "Connect your device" button in the email, connect your hardware device, and follow the instructions.
To view details on how to add your specific device, find your device in Adding hardware devices to Casa .

Example web flow for Ledger. Your signing experience will vary based on your specific device.
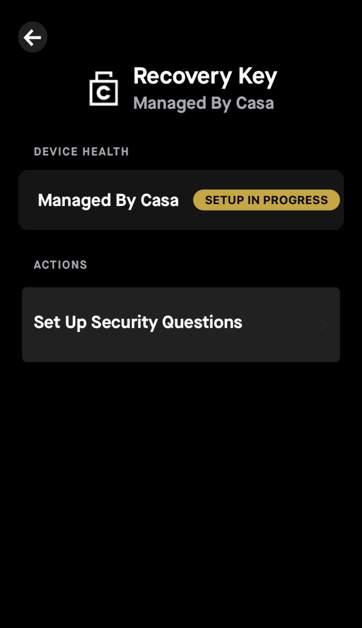
Finally, set up the Recovery Key.
Tap "Set Up Security Questions."

If you ever need to use the Casa Recovery Key, you'll need to answer all of these questions exactly as they were written during this setup process including symbols and/or spaces.


Review your completed 3-key vault setup by tapping the "Healthy" button below the vault, then tapping the mobile key and hardware key to perform a health check.
It's recommended that you test your setup using Testnet ethereum (TETH) before depositing real funds. If you do use real funds, start with small amounts.
You've now set up your 3-key ETH vault! Way to go!
Please note that you can also use ETH Pay in Casa Pay as a "single-signature wallet" in the Casa app. The ETH Pay wallet is designed to store smaller amounts and requires only your phone to sign and send transactions.