This article applies only to BTC vaults. In ETH vaults, replacing a key updates the smart contract without creating a new vault, so no funds transfer is needed.
After marking a key for replacement and adding a new key, the Casa app prompts you to select between options on how to make transfer: Continue Guided Recovery or Perform Manual Recovery:
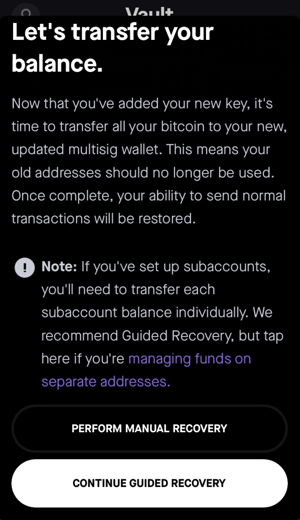
The Casa app simplifies the recovery transaction process with Guided Recovery, which automatically creates the transaction for you. On the other hand, Manual Recovery is a more involved process where you create the transaction yourself.
For both Guided and Manual Recovery transactions, you will not be able to sign with the new key that replaced the old one. You will only be able to sign with keys from the the "old" vault since that is where the funds are coming from.
Guided recovery
Guided recovery is the easiest way to transition to a new keyset in the Casa app. It does a few things on your behalf:
- Creates the transaction
- Sets the amount of the transaction (the full balance)
- Determines the address to send the transaction to (the address for your new vault)
- Ensures that the address you're sending to is safe (part of your new vault)
We recommend guided recovery for all recovery transactions.
To create a transaction using guided recovery when transferring to a new keyset, tap Continue Guided Recovery, and simply follow the prompt to create, sign, and execute the transaction.
Manual recovery
With manual recovery, you have the option to set a custom transaction amount, enter any BTC address to send to (including external addresses), send from specific addresses, and send from specific UTXOs.
Because manual recovery involves a smaller margin for error, we generally recommend using guided methods whenever possible.
Since guided recovery is initiated by default, after tapping the darker button titled Perform Manual Recovery, you must also cancel guided recovery to initiate manual recovery. You can do this by tapping I understand, continue:

Next, you'll see the dashboard of the "new" empty BTC vault with a Transfer Funds button in the middle of the screen, tap it:
.jpg?width=277&height=601&name=File%20(1).jpg)
Now select the Archived Keyset that has a Transfer Funds button showing. (If you have replaced keys in the past, you will also see your previous archived keysets.):

Now you'll see the transaction history and balance of the archived keyset. From here, you can tap the "Send" button to initiate the transaction as you would under normal circumstances, either using one of the shortcuts to send to one of your Casa addresses, or entering an external address. We recommend using the Send Max button to make sure you send your whole balance.

That's it! You can now execute the Manual Recovery transaction if your goal was simply to specify an amount or provide an external address. Alternatively, if you want even more control over how your funds are sent to your new vault, you have the option to tap the Send From: Auto-Select button to send from specific addresses and UTXOs if you have concerns about privacy and/or UTXO consolidation:
On the Send From screen, you can select one or more individual "old" vault addresses to send funds from—but it’s important to understand what that really means in Bitcoin terms.
When you choose to “send from a specific address,” what you’re actually doing is selecting unspent transaction outputs (UTXOs) associated with that address. Casa uses those UTXOs to fund the transaction.
So while it may feel like you're sending from a particular address, under the hood, you're really just spending UTXOs tied to that address—not the address itself.
-1.jpg?width=284&height=615&name=File%20(1)-1.jpg)
You also have the UTXOS tab for even more control over how to send your funds to the "new" vault. Using the UTXOs tab lets you fine-tune exactly how your Bitcoin is moved, giving you full control over both cost and privacy:
-1.jpg?width=293&height=635&name=File%20(2)-1.jpg)
Why choose specific UTXOs?
This kind of control is common among power users, businesses, and privacy-focused setups. It allows for lower fees by avoiding small/inefficient UTXOs, helps prevent linking unrelated funds, protects privacy by hiding total balances or transaction history, and supports better tracking or restrictions for security and compliance purposes.
Real-world example:
-
Let’s say you received 2 BTC from a mining reward (UTXO A), and 1 BTC from a friend (UTXO B).
- You want to pay someone 1 BTC, but don’t want to use the mining reward (maybe it’s being audited).
- You’d instruct Casa to spend only UTXO B, even though you could also use UTXO A.